

As we approach the first anniversary of this camper’s restoration – and the coming of its second big camping trip since then – I figured the time was right to share its story.
If you’ve ever considered buying a stick-built RV of any sort that “needs a little TLC”, consider this a preview of all the grueling torture fun and excitement you’re missing out on.

For a number of years, it has been a family tradition that we – myself, my father, and my sister – all get together and go camping in early August. In the beginning we simply roughed it, piching a tent and sleeping on the ground. That had been the way I’d grown up camping, and it seemed the obvious way to introduce Katie to it.
But as the years went by, tent camping became more burdensome – and less attractive – to the adults involved. So two years ago, I decided to try something different.

Our grandparents had a ’76 Holiday Rambler travel trailer that had been parked in the woods for a good 2.5 decades. It was sort of a cabin substitute, in that it had been purchased, towed to their weekend property, and not moved since. It had been kept clean and leak-free, but years of sitting had left its roadworthiness in serious doubt.
Though Grandma didn’t hesitate in volunteering the trailer for that year’s outing, I had my reservations. It had shot tires, locked-up brakes, and was of questionable physical integrity after so many years of sitting. But after a few weeks of cajoling (along with the looming prospect of sleeping on the ground for several nights), I finally relented and got to work on the trailer.
The week that followed saw me installing four new tires, four new brake assemblies, and four new wheel bearings, along with wiring, bulbs, and a host of other parts, all in the secluded spot where the trailer sat. After cutting down a few inconveniently located trees (funny how much they can grow in 25 years!), the Rambler was finally ready to ramble.
Our time spent in the trailer was nice. The time I spent towing it, however, was much less so. Being as I was between tow rigs at the time, I made the regrettable decision of hooking it up to my 2003 Chevy half-ton pickup. I had to beef up the rear suspension on short notice to make the trip possible. And though I made it there and back (50 miles each way), the truck’s weenie little 4.3L V6 complained to no end about the added weight.
All in all, I figured our experiment had been successful. We now knew that truck camping was the way to go, and we knew that a full-sized trailer was overkill.

So for the following year, I decided that a pick-up camper would be a better choice. I looked for weeks, but found nothing but junk.
It seems that one is likely to encounter two main types of old slide-in campers. One is the pop-up kind, which involves canvas sides that are almost always shredded. The other is the stick-built kind, which has an aluminum skin over a wooden frame, and almost always leaks like a sieve.
In the case of the latter, those leaks generally occur at the aluminum covering’s seams and edges. Any water that enters will eventually cause the wood within to rot. When that happens, you’re left with a moldy pile of garbage, with a bit of scrap metal mixed in to lure the uninitiated.
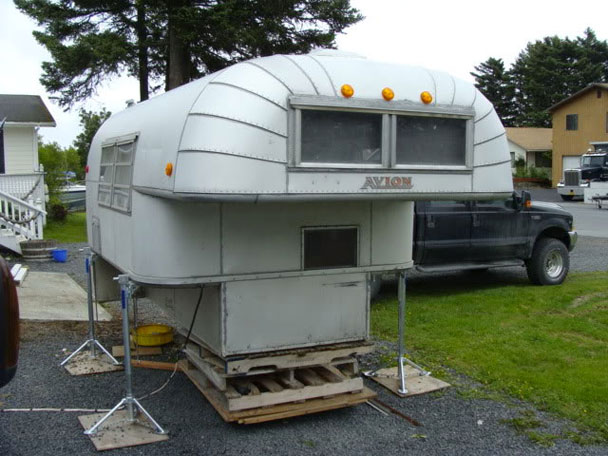
By the time I’d rejected around six of these waterlogged rat-traps, I was beginning to lose hope. My expectations were therefore rather low as I rolled up on Potential Rat-trap #7, an ’87 Hide-Away (aka Sun-Lite, aka Sun Valley, aka Yet Another Brand from Elkhart, Indiana that doesn’t exist today).
As opposed to the other dilapidated wrecks I’d seen, this one actually showed some promise. It was a one-owner rig that had been kept clean and intact. The owner had even stored it indoors for most of its life. Unfortunately, a change in his garage situation had forced the camper into the backyard a couple of years prior, at which point the usual story of water intrusion began.
I wish I had “as received” pictures to show you – but since I don’t, suffice it to say that this one was in mighty nice shape on the surface. The only thing that marred its otherwise upstanding condition was the rotten wood under the top bunk bed.
For $750, I wasn’t willing to take a gamble on how far the rot actually went. What price would convince me to roll the dice, the owner asked? $400. My low-ball offer was immediately shot down.
Oh well, I figured, it’s not like the world isn’t filled with rotten campers; I did all I could, and now it was time to move on. So I got back in the truck and prepared to inspect the next moldy nightmare on my list.
About ten minutes later, the seller called me back and relented. I swung around, handed him the $400, and left with the camper.

Upon unloading the camper, my first concern was finding out just how extensive the water damage was. I knew the sheet of plywood that supported the front bed was poke-a-finger-through-it rotten… but what else would need replacing? I spent an hour or so carefully disassembling the nose of the camper to find out.

How bad? Really bad.

Really, really bad. The rest of the camper was sound, but the whole nose would need to be rebuilt.
The camping trip was a week away. With no time to lose, I got working.

The main 1×4 on both sides was cut out and replaced, eliminating the final 3′ of each that had rotted away.

I had planned to use strips of steel and wood screws to attach the new wood. But after discovering that the thickness of the screw-heads and steel strips interfered with the flush attachment of the paneling, I had to revert to the factory method: strips of aluminum siding and a staple gun. (At least I used a reasonable amount of staples. At the factory, 2-4 per strip was considered sufficient!)

The entire front nose assembly also had to be built, using what dimensions I could glean from the previous rotten chunks. Everything was made from standard lumber; nothing fancy here. Only the plastic corners for the front window were reused – and even those were iffy, being old and brittle.

Thankfully, one of the two lower curved pieces was intact enough to trace the basic shape onto new wood.

Oh, and did I mention the FIRE ANTS? One of the original pieces of wood in this area was crawling with them. I was still being (bitten? stung?) for hours after the offending chunk of wood was gone.

At this point, I was about two days into the project, and rather exhausted. But at least I knew the worst of its problems were now behind me.

With the new nose assembly installed, I could now begin carefully reattaching the aluminum skin.

Getting it to stretch correctly around my SWAGed wooden structure was a bit of a challenge, but it worked out in the end.

Staples, staples, everywhere – that’s the cheap-built camper way!

At long last, I was able to install the new plywood for the bed.

The front support was supposed to be stapled. I made a new one, reinforced it with a 2×2, and used wood screws. No one will be falling through the bed and onto my cab, if I have anything to say about it!

Add some insulation, a few 1x4s for support, and the requisite aluminum strips full of staples, and we’re finally nearing the end. I decided to replace all the loose fiberglass insulation with foam-board… it’s easier to work with, and should be more effective that the original.

Time to button it up! That meant more staples, some wood screws (to attach the aluminum edging), and lots of gooey butyl rubber for sealing the seams. I decided to scrape off all the old sealant – not just in the area I’d been working on, but all around the camper – and apply the new sealant, to ensure there’d be no future water issues.
Speaking of water issues: Early in the project I did debate eliminating the front upper window, as it seemed to be the source of the original leak. The plan would have been to frame the nose without the opening, and then replace the upper aluminum panel with a new sheet. But after finding that matching aluminum was not available, I decided to stick with the original design instead.

Butyl rubber is no fun to work with… but if you want a dry camper, it’s what works.
I also ended up replacing much of the molded rubber trim, as well as several of the clearance lights whose seals were no longer water-tight. Anything to keep the water out!
There was also a noteworthy amount of scrubbing done to make all that aluminum siding nice and white again, along with some paint pen touch-up on the vinyl stripes.

With the exterior issues resolved, it was time to focus my attention on the interior.

I tried to leave as much of the wood paneling and cabinetry intact as possible. But for parts that were damaged, or had to be removed to repair the nose, I cut out and installed new pieces of paneling. The pattern was vaguely similar (or as close as one can find at Menards). I also put down some carpet in place of the ugly vinyl flooring.

The ceiling panels were okay (aside from being covered in some terrible looking wallpaper-type stuff), so I left them be. For the nose, I cut and installed some white paneling for the upper area, and some more woodgrain for the lower section.

After removing all the hideous wallpaper-type material from the ceiling, I masked it off and painted it.

The paint was the usual sort of off-white, into which I mixed some sand for texture. (I first tried some “popcorn in a can” type product that was ridiculously expensive and promised the moon, but unsurprisingly fell short. At least it came with a money-back guarantee!)

Much better!

I also installed some new 12-volt light fixtures, which replaced the dated and broken originals.

The original cushions seemed to be in decent shape at first, but upon closer examination had lots of issues. I ordered two foam twin mattresses from an online supplier; one was installed intact onto the top bunk, the other was cut up to make cushions for the sofa and lower bunk. I also purchased a bunch of fabric for making covers and curtains, but didn’t end up having time to try making any before the trip.

So the outside’s looking good, the sleeping arrangements are handled… what’s left?

The kitchen, of course. Though all the appliances worked, it was a sea of chrome and pink Formica, with ducks on the backsplash. Since I had to rip it all out anyways (to replace lines, wires, and check for rodent damage), I figured it was time for an upgrade.

The new countertops went in with minimal effort. They were cut from a damaged piece found in the bargain section at the local lumberyard.

After that came the new tile – another el cheapo affair, made up of the remaining stock of a discontinued style. When you have so little space to cover, leftover quantities are usually plenty.

All that remained was to measure and cut…

…and reinstall the fixtures.
The stainless steel sink cleaned up nicely. The chrome range and vent hood were too scuffed up to be reinstalled as-was, so they got some quality time with the wire wheel, followed by a few coats of almond Rust-Oleum I’d had from another project.

Since the seals were worn out in the original hand-pump faucet, I was forced to buy a new one (at $45, it was the single most expensive piece of the project).

Though it was far from finished, it was entirely usable in its current state. And I’d gotten it there just in time. With five days spent, it was time to load it up and hit the road!

Being exhausted from a week of all-night camper repair probably wasn’t the best way to begin a week-long camping trip. But Katie thoroughly enjoyed the outing, which helped to assure me that the ordeal had been worthwhile.
Would I take on such a project again? Probably not (or at least, not unless you happened to drop a Cayo or an Avion in my driveway). In fact, I consider myself fortunate that the damage wasn’t more extensive; most of the other rigs I looked at would have been far, far worse.
But in the end, I got what I’d set out to find: a nice, clean, solid pickup camper for around a thousand bucks (which, counting the initial purchase and materials, is about what I ended up spending).
A word to the wise: If you’re looking for a camper of any sort, inspect carefully! Yes, anything can be restored… but would you rather spend your summer enjoying the wilderness, or up to your elbows in soggy building materials?


Nice work! Seems to be a decent amount of space in there considering the external dimensions.
Great work, enjoy it looks great!
I wonder how many RVs and campers were NOT built in Elkhart, Indiana?
Well, you have answered for us why we have not seen much action on Project Jag. Good heavens, man – when do you have time to work? I mean at your business?
An enjoyable (armchair) way to see how these old campers were built. Thanks for the tour, and glad you got some enjoyment out of it in the end.
“When do I have time to work?” During the day. This was done in the evenings. It was also done last year, so no interference with the Jag.
Speaking of which, it’s been more than the two weeks specified by the junkyard, and yet no phone call to tell me I have tank(s) waiting. Guess I better go pester them a bit.
I’m pretty sure my 1972 Superior motorhome was built in Lima, OH
Oddly enough, a lot of RVs are built in Oregon. Coburg, just north of Eugene is home to some high end motorhome builders and there is a cluster of trailer companies near La Grande on the East side.
Northstar is built in Cedar Falls, Ia. and has exceptional quality
Amazing job–enjoyed the article
I gotta hand it to you, Keith, you really know your way around this stuff. I can’t even imagine doing all that in a week.
I checked out a bunch of these at the Portland RV Show and never realized how they were built. Well the way they were built does save weight. Impressive work you did. Some states require these to have a license plate which is interesting.
Oregon and Washington are two such states.
Keith, I can tell you really enjoyed this project even though you tried hard to cover it up.
You are a gifted man and you have such a nice large machine shed for your projects. And the result is not bad for 5 days of work, not bad at all.
How much would a new pick up camper be? 10000 to 15000?
I didn’t know we had fireants in Minnesota.
Fireants, as if we need any more reasons to not go outdoors 🙂 Seriously, another well written article from Keith in which he displays skills that most of us could never hope to obtain.
Agreed. Although given twice the money and time, I could probably do half as good a job…
On top of everything else you had to deal with fireants!?!?
Man, what a job.
I am thinking that the camping in a tent idea is not looking so bad at this point.
Very nice work. The best part its leak free.
Quite an interesting project this one. Definitely lucky it was only rotten in the nose, my dad did a similar project on his camper and he had to replace an entire rear corner on that one. My only project of this nature I’ve undertaken was a restoration of my boat. I gutted the interior and rebuilt the entire floor and all of the stringers, plus some general modernization of the interior. Actually I suppose if there in any interest in a project like that I could probably write up an article on it.
you got to ask?????!!!!!
(better do a write up on a boat before Keith finds one.)
A preview of the next “Lessons Learned The Hard Way” 🙂
(aka The Speedboat That Kicked My A**)
I’ve restored a handful of Class C and travel trailers and can assure anyone who is looking at a used camper that the roof leaks. Oh you probably can’t see it now, but it’s leaking as we speak. The stick built shells are far easier to repair/rebuild than the new foam sandwich lightweight trailers made in the last 10-15 years.
If you see silicone sealant, run. Silicone sealant does not in fact seal and its existence means that the owner has already encountered a leak but happily chosen a placebo either out of ignorance or laziness. If you see asphalt roofing sealant or tape, run faster.
Stick to older trailers with aluminum roof skins given that the metal itself rarely fails and is easy enough to pull back when you’re inevitably replacing the roof decking in a two-foot strip along the entire length of the rig.
If you are considering a newer lightweight trailer that’s sandwich construction you’d better have access to a shop large enough to house the entire trailer, with drying fans that you can afford to run for several weeks to dry the foam out. After that, you’ll need a stout framework to support jacks as you scramble to spray adhesive and press fiberglass panels against foamboard in the hope that they will bond back together.
Given all those caveats, I’d much rather spend a month and a few grand to restore an older camper than take on the expense of a new one that depreciates at a rate comparable to Zimbabwean currency. It also provides you the opportunity to rebuild as if you actually mean for the rig to last instead of hoping the staples can hold until a buyer hauls it off the dealer lot.
^ Great advice. Anyone reading this thread later, be sure and pay attention to this comment!
What brand sealant did you use?
Can’t believe that it’s all held together with staples. In Canada I think all small trailers were made in Strathroy, which is probably the Ontario equivalent of Elkhart..
Nice job.
Butyl rubber is the only sealant you should use. You can buy it in tape strip form or you can buy it in caulking tubes. The strip form is more expensive but easier to work with. The caulking tubes are good for filling irregular areas and for spreading across wider areas (decking under roof seams for example).
Yeah, some great words of wisdom for anyone even considering buying a camper (of any sort). It sounds like there are essentially two kinds of used campers for sale: those that obviously leak and need major work, and those that just don’t look like it.
Makes me appreciate my all-fiberglass Chinook Class B; molded fiberglass does not leak! Except of course unless a tree branch penetrates it. I bought my ’77 Chinook for $1200 because a branch was sticking out of the front top, and that had let water in and made the front nook wet and moldy. But it was mainly a matter of tearing out the horrible bright green shag carpeting, and recovering the nook on the inside with industrial carpet, and putting vinyl on the floor (opposite of what you did; easier to sweep out the sand from the beach than getting it out of a carpet, especially a shag one.
Anyway, bought a fiberglass repair kit, and learned something new. It worked out pretty well, and no more leaks.
By the way have you had a chance to take the Chinook out on any trips this year? I really liked the post you did a few years back on taking it out to Glacier.
Not yet. Took it out last year on a shorter trip.
Got a luggage rack or roof vents? I’ve dealt with plenty of leaks that were due to failed seals around those despite the fact the roof itself was in fine shape.
That looks like an insane workload, but your determination paid off; it looks great! Thanks for the great story and pics!
Good job , well written ! .
-Nate
Great piece, Keith. I’ll join the chorus and say that your skill set and time management never cease to amaze.
Wow man, Im impressed! You’ve got skills for sure, both in actual ability and time management. I didn’t have a clue what was inside the skins on these things.
Seeing yours in the garage reminds me of a hasty adventure with an ex g/f’s brother. We took my ’95 Wrangler on some back roads around Sutherlin, OR….wound up bashing thru some secluded sections of a mountain. We got to a gravel road after getting good and lost, and one of these was propped up on the side of the road with a mailbox in front of it!
This was way more interesting than I had expected. Great job!
Keith and Fallous offer good advice.
I have spent YEARS searching the ads for an acceptable used camper. It is a fool’s errand.
Most American made RVs are sold like cars, through dealers, which translates into necessary short cuts at the production end in order to stay in business.
I ended up building my own.
Yeah, you quickly learn to modify your definition of “acceptable” when looking at used campers. Quality and health of major systems are the determining factor, not the interior/exterior nor the desperate hope that it’s structurally sealed and sound.
If HVAC is good, appliances are good, electrical and plumbing good, driveline (or trailer frame/wheels/axles) good, then you’ve got an acceptable rig since you have the expensive bits necessary to rebuild and end up with a quality rig.
Very enjoyable post Keith!
Will we get to hear about that red 1973-75 Grand Am sometime?
One of these days. Unfortunately, there’s not much to tell with that one – saved it from an uncertain fate, got it running, sat on it for a year, and ended up selling it.
But it was still a neat car. Gotta get that (and several other COALs) done in the months to come.
Keith T., I tip my hat to you for the more-than-just-competent restoration and the engaging prose. Bonus points for doing the work in such a short timeframe!
On TV earlier this summer, one of the cable channels had a show looking candidly at Amish life, especially for teens. We visited a (likely) 19-20-yr old young man (Amish) at his job in an RV factory (Elkhart, I believe), and I was amazed to learn of the stick construction and the speed with which the workers scurried around with their staple/nailguns. Silly me, guessing the framing–if wooden–would have glued, screwed, and even mortised joints.
Keith (and Fallous), I learned a LOT from today’s column, as I’ve been very tempted to try one of those old truck-campers…….
Keith, you are very talented and resourceful.
Ive owned one travel trailer/caravan towed it up and down the eastern half of Aussie for a few years it was all alluminium construction and clad a 16ft Viscount 1974 never leaked on site and I towed it thru a violent thunder storm once so bad I could barely see where I was going but when I stopped for the night the interior was dry, I” count myself as lucky as I know others who had leakage problems with much more expensive caravans than my cheapie.
Very talented Keith – both as a writer and as a camper-fixer. Very interesting post!
Is there a site that features blog entries similar to this (like curbside classic, but for RVs)? Between CCC and a site like that I’d never get any work done!
There are lots of Facebook groups dedicated to vintage trailers and campers.
I’m in the process of restoring my 1975 Cygnet 16′ Deluxe. It was built in Woodstock NB Canada, about 3 hours drive from my home. It’s based upon a British camper of the same name, but adapted to North American road standards.
I have a second one as well (a ’79 18′ Deluxe) that is basically a parts trailer and a bunkhouse/playhouse for my kids.
I’m dreading taking the rear skin off of it, since it seems a little soft back there. After seeing what you accomplished in a short time, I may get at it sooner than later.
The attached picture shows it before I did anything to it other than updating the propane tank. I’ve since stripped and painted the frame, added an original awning, updated the tires and added original chrome dog-dish hubcaps. I’m now in the process of replacing the rubber trim pieces and updating the lighting. The next big step is to install the 1970s Dometic fridge, since the one in mine is not original. Let’s hope it works!
That was a great look inside the guts of a camper and convinces me that a fiberglass camper like a Bigfoot or Casita is the way to go. How common are such things in your area? I see a lot of “egg” trailers made out of two fiberglass moldings and the Bigfoot molded truck campers are semi-common as well.
My modified Dodge pickup had a topper on it when I bought it, and after a few years of ownership I removed it and set it aside, propping it up off the ground with some old plastic buckets I had. After only a couple of years, explaining to my wife numerous times that I really was going to do something about it and she didn’t have to keep pestering me every six months, I raised the back door, climbed in, and discovered that every stick of wood in it was so thoroughly rotten that the rot had to have been well under way while the topper was still on the truck. In the process of parting it out I found that it was built in a very similar manner to Keith’s. It was too bad it was too far gone to save, because it had been a nice topper, equipped with clearance lights, indoor lights, back and side windows, a small indoor cabinet, and a locking rear door. I kept the hardware and windows in hopes I could find someone who had a use for any of the stuff, but its time is becoming mighty short.
Because the wood was so rotten, I had little trouble subdividing the topper’s materials into pieces small enough to fit into a standard garbage can, so disposal over a period of a few months was essentially free.
Impressive effort and results. Your ceiling restoration made me think of this product. I’ve used it as siding on my garage door frame when I needed to skinny back the original frame to get a full 9′ out of my 9.0 door so I could get my trailer in. I couldn’t find any sheets of flat vinyl siding, and the guy at Lowe’s suggested this stuff. Would make very good camper interior walls, and it holds paint very well. Four years outdoors on my garage door frame and still looking good.
Individual panels are quite cheap in the store.
http://www.lowes.com/pd_8566-293-FTSTF.1_0__?productId=3162499&Ntt=4+x+8+fiberglass+sh&pl=1¤tURL=%3FNtt%3D4%2Bx%2B8%2Bfiberglass%2Bsh&facetInfo=
Great article.
Nice repair job. Really admire the way you fixed it right. I have an old 89 Skyline 5th wheel used as a spare room, I think the way to keep it from leaking is to build a cover with a real roof over it. They do seem to be destined to leak no matter how you try to seal them as they age. Fiberglass construction is much more leak free, I had a 74 Pioneer with fiberglass roof, end caps and tip out and it was a lot easier to keep sealed up then the Skyline I have now. By the way, it was built in Mcminnville, Oregon.
The trials and infestations described here make me glad once again that my 30-year-old compact travel trailer is a Scamp– made of a durable fiberglass “egg” shell, it will certainly outlast me, and maybe a few more owners to come. There’s only one continuous exterior joint that circles the shell at its equator, and most of the dozen or so moving parts are cabinet hinges.
You did this in a week? I rebuilt a 70’s camper and it took almost 150 hours. Great Job.
We just bought a 1989 Hideaway just like yours. I’m wondering if anyone knows how to get a hold of the owners manual for it. I would just like to have it to look at if needed. I’ve looked all over online and cant find anything. Anyone else have better luck?