

I grew up in the salty north where rusty cars were a fact of life. In my youth anything I could afford would undoubtedly come with some rust. And having at least some pride in whatever I drove, learning how to deal with that rust became a crucial life skill.
Fast forward about forty years. Modern cars do not rust nearly as badly as those of the 1960s and 70s. OK, except for Mazdas, but that is a topic for another day. Honda in particular has made amazing strides in this area. Through the first half of the 1980s Hondas were rusters. But then this changed and we rarely see really rusty old Hondas.
With one exception.

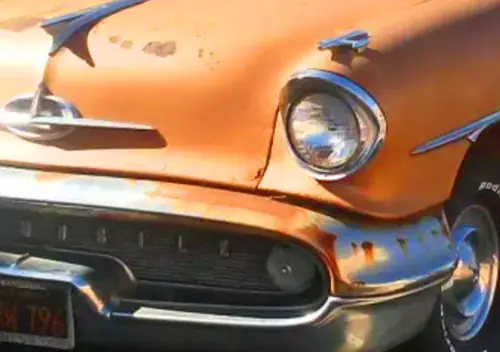
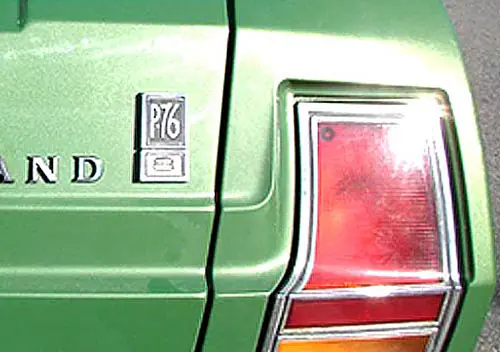
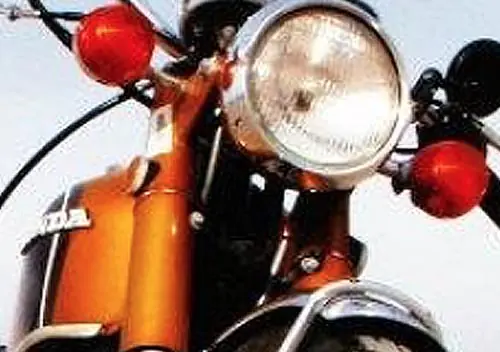
Hondas of the last generation or two have developed a tendency to turn brown in a little corner of the rear quarter panel where it meets the plastic bumper right over the rear wheel.
My Honda Fit was the first new car I had bought in many years. It is now right at about twelve years old (having taken possession of it in November of 2006). Over the last couple of years the “Honda rust spot” has been developing. In my mind I knew what I needed to do. But in another part of my mind this was still my new car and the idea of using sandpaper and a spray can on it was something I just could not bring myself to do. By this summer, however, the problem had become unavoidable.

First, why do these rust here? I now know. Where the wheel opening meets the bumper cover there are several plastic parts that come together. A nylon nut pops into a square hole in the steel quarter panel lip. A black plastic piece that holds the bumper cover in place (a bumper side support) terminates with a half-hole over the nylon nut. The bumper cover itself has a hole there and a little screw goes through the hole in the bumper cover, then through the plastic support and into the nylon nut in the steel quarter panel.

There is perhaps 1/16th of an inch of space between the steel panel and the black plastic side support which invites a layer of muck to collect. The moisture trapped there gets under the paint around the nylon nut and then begins working its way out in every direction under the paint. It eventually eats through the outer sheet metal surface and continues inward until something is done. And so I began.

The plan was to attack both sides. The drivers side was the worst.

The passenger side was in a much earlier stage. Depending on my level of impatience during the process I took photos at various stages of both sides.

It was soon apparent that I would need to remove the plastic bumper cover support to get decent access to the rusty metal. There is a Phillips head screw that attaches it to the body at the rear of the piece and a plastic tab that pops into a slot which secures the middle. I ended up cracking one of them while I learned the removal technique, but some J B Weld fixed it right up.

The front, of course, released when I removed the screw that attaches the leading edge of the bumper cover to the quarter panel right behind the wheel opening.

First: Grind. Years ago I discovered these plastic abrasive sponge pads from The Eastwood Company. They are abrasive enough to remove paint and surface rust but soft enough that they do not take a lot of metal with them.

The passenger side shows how this job would have gone had I gotten a start on this a couple of years earlier. Getting most of the paint/rust off of the lower quarter lip was a start, then I went as far up the outside of the quarter panel as was necessary on each side.

The drivers side proves my causation theory. The outer layer of steel was eaten away but the backing was intact. There was no rust-through evident from the underside of the car.

Second: Treat. I still had an old product called Oxy-Solv that I had bought from Eastwood. It chemically treats the rust and converts it to a zinc oxide (according to Eastwood anyway – I am no chemist). It worked – some. Whether it was the age of the stuff (over 20 years) or my impatience, it was not doing its thing fast enough.

I went to Plan B – a Rust-Oleum product called Rust Reformer. The instructions say paint it on and let it sit for 3 days, then fill or paint over it. Will it work? We shall see. If When I have to do this again in a few years maybe I will have some more experience with these rust-stopping compounds by then. If there is a weak link to this repair it is right here.

Third: Fill. The passenger side would need nothing beyond prime and paint. The drivers side, however, was too far gone for that. Some Bondo Metal Putty was the filler of choice. I have not used this particular product before but have it on the authority of an old body man that metal putty tends to last longer than traditional plastic filler. I spread some over the low spot then came back to sand it down smooth after it had dried.

This is where some of my impatience came into play. This was being done in mid October so temperature was becoming a limiting factor. The number of good days (warm + dry) for painting was dwindling fast, so I got in a hurry. With more patience and more time my putty sanding would have resulted in a perfectly smooth surface that matched the original. I did not quite get there, becoming belatedly satisfied with a bit of a high spot over the main place of the repair and a couple of little depressions elsewhere that could have been fixed with another small putty application. But sometimes good enough has to be good enough.

Interlude: Other Stuff. While waiting on rust treatment and putty to dry/cure I turned my attention to some of the lower plastic pieces that have gotten badly scraped and scuffed over the years. Under the white paint is black plastic, so the scrapes and gouges stood out like a sore thumb. And generated multiple reminders at home that Mrs. JPC had certainly not made any of those marks, so they must have all been me. Mask, sand, prime and spray. My paint technique will be explained below, but this part came out pretty well except for a slight difference in the shades of white between old and new.

Fourth: Prime and Paint. Dupli-Color spray cans and I have a long, long relationship. I have had great results with it, and I have had some that have been less great. There are two variables – color match and surface preparation. I can control only one of these.

After a light sanding with 400 grit paper some primer went on. One of the best tips I ever got was to NEVER mask off the actual repair area. I masked off areas farther out from the repair to protect from overspray, but paint application was controlled with a piece of cardboard held in my non-spraying hand. With the cardboard held about an inch from the surface being painted, spray normally. You get a nice, soft edge that will not leave you with a “masking tape ridge” you have to deal with (or look at).

One other trick – if you do spray up to the masking tape edge (as I did with the plastic trim pieces) do not press the entire width of the tape against the surface. Instead, press half of the strip to the surface and then fold the other half of the tape out away from the panel. This is another way to soften the edge of the new paint so that it will be easier to blend.

Each step (primer, color, clear) will go just a little farther out than the last step so the area of between-coat sanding will get a little larger each time. Although I normally try to extend my new paint to a character line or panel edge I decided against that here. Because I was short on time I did not want to paint that much, which would have involved going to a ridge midway up the quarter panel and down the dogleg ahead of the rear wheel. Also I have no experience in spraying a clearcoat over single stage paint and decided that the smallest area possible would be prudent. If I experience some kind of failure the problem area will be smaller.

After the primer dried I did some light sanding with 600 grit paper. Now for the moment of truth. Dupli-Color Perfect Match spray is a two stage lacquer product. My car was originally finished with a single stage enamel. Going from one kind of paint to another is sometimes a problem, but in my experience new lacquer over old enamel will work. (I recall the opposite being a really bad idea). A single stage spray would have been perfect for me, but those have become largely extinct for we driveway-painters.

One problem was the color coat itself. It was a frustrating mix of two seemingly irreconcilable traits. It did not cover all that well well yet with that one last spray pass for a little better coverage would cause it to begin running. Given the threatening weather (and after some bad words) I pressed on. A little between-coat sanding took care of the small runs I got in the paint.

After two or three applications (with light sanding in between each of them) we got to that place – good enough for a twelve year old car in late October. The final step was the clear coat. A light 600 grit sanding on the color (and just a bit out from the new paint) and I sprayed clear on an area slightly larger than my repair. And . . . done.

Am I completely satisfied? No. I know that if I had started this earlier in the fall I could have taken my time and gotten a better result. I know that I have the skill to make this come out really right, but it was going to take time that I did not allow myself. I am also honest enough to know that in this part of the country rust on a daily driver always comes back, so this will not be my last opportunity if I choose to keep the car.

But on the other hand, white is a very forgiving color in that surface imperfections are not easy to see.

If you get up close you can see that the repair is not perfect but from roughly 97% of the angles and distances that matter I have a Honda Fit that looks not a whole lot worse than it did when it was just a baby. The car has a lot of life left and I like it, so it was worth the time and effort. The opening photo shows the finished product. I am happy.
Further Reading:


Ah, Honda rust. That’s indeed the spot if you look at them after they gather a few miles.
My son’s ’93 has been let go long enough that, well, there’s over 200,000 on the car and PA’s body laws have been relaxed enough to where – at this point – it’ll just keep going ’til he can afford to retire and replace. The body has plenty of dents and dings in other places anyway.
I live in Des Moines, Iowa ( We salt all streets, all winter) and ALL Hondas eventually rust in this exact spot. A walk thru any parking lot will reveal multiple examples.
I enjoyed this article. I learned some things and I enjoyed the description of how you did this. A nice article and almost as good as sitting in a folding chair, drinking a beer while watching you work.
I had the same experience with Dupli-Color on my Stone White Town & County. Really had to dust it in with many light coats and extended dry times for the base coat. You are dead on- body work is all about taking your time. Eastwood has some good products. Try their Rust Encapsulator. Rust-Oleum recently changed the formulation on their Rust Reformer. It used to have black pigment. The new stuff is clear, doesn’t have a shaker ball marble and you need to really soak the rust. Another trick with Dupli-Color is using the right spray tip. The body color cans come with the red fan spray tips for large areas. Keep them clean. The blue tips on the large generic color cans have a round spray pattern. The Dupli-Color low gloss black I shot on my LeSabre’ s firewall looked horrible until I switched to the red tip and re-did it.
Nice job! Brings back memories of high school and doing that every spring on my ’90 Civic wagon. Some things never change! My dad’s 07 Fit that replaced said Wagon is farther along than yours, and aside from bombing it with Fluid Film he hasn’t messed with it. Oh well, it isn’t structural and that little Fit is perpetually covered with dirt and dust as the little farm hauler that it is.
My most recent bondo-rust repair was on a Maxima that I flipped. Combination of a decent dent on a rusted panel. Black made it easy to color match at least!
The black paint is a mixed blessing to me. The color is never off, but it will show every single imperfection in the surface when you are done. I am just glad my car isn’t one of the silvers or platinums that have been popular. Those light metallics are awful for doing spot repairs. My calculation on how far to paint would have been completely different than with my non-metallic white. You simply have to go all the way to a character line or seam or else you will end up with a car like a 68 Mustang that a buddy’s brother owned in high school. It was light metallic green but had little spots all over it where the slightly different shades of Dupli Color spray showed themselves. The car looked like it had polka dots all over it.
Sometimes good enough IS good enough. Taking into account that Hondas have historically been renowned for continuing to run in spite of their diminishing structural integrity, let’s hope this repair is just the first in a long line of youth-extending derm-abrasion treatments.
Reading through this I couldn’t help thinking of an old friend’s ’81 Civic wagon, which by the Summer of ’87 had rusted to the point that the lower front fenders had let go of their anchoring points at the rockers. At speeds above 45 MPH the car looked as if it was trying to flap its wings and take off. Hondas have indeed come a long way in this regard.
Being just a bit younger than JPC, I had no occasion to learn these skills, despite being a Northern New Jersey native. By my time most of the chronic rusters of the 70’s had been retired from daily use even among teenagers, just because…well…’70’s cars were often considered winners if they ran long enough to rust. I’m impressed with the skill and patience that went into this repair. I have to admit that I’d have probably done a real hack job if it were left to me.
Yes, we used to get a lot of practice! I should have included this picture of my 71 Scamp from the summer of 1981. That was about a 6 week job that involved lots of sheetmetal, lots of rivits and lots of Bondo. On the plus side a good friend was a trained bodyman and he brought his air grinder and air sander, along with his experience. In that one the bodywork turned out better than the paint did – mainly because my friend’s perfectionist tendencies overrode my tendencies towards impatience.
I would no more tackle this on a daily driver today than try to eat thumbtacks. But when I was 20 it was a great idea.
So true about 1960s and ’70s cars and rust. Take this Marina, M prefix plate so registered between August ’74 and July ’75. So how many years have we rolled forwards? Less than five! This is April 1979.
I can remember growing up, a routine rust repair was to have floors replaced. I can still vividly recall as a child, seeing the road below through various small ragged floor holes in the early 60s Chev that belonged to my friend’s dad.
Gas tanks were also notoriously vulnerable to leaks caused by rust.
My parents’ first car was a ’77 Citroen Ami. It was sold in 1983 for £50 after the floors rusted through. It still looked OK – it was bought new by my fastidious great uncle, and I would guess had at most about 40k on the clock.
A guy my dad knew offered to sneak it into the naval shipyard where he worked and repair it, but dad was afraid the guy would get fired, so he declined. My mum saw it, going strong, at a ski area years later. She looked underneath when it parked up and it had been amateurishly welded and undersealed.
I imagine resale value at this point would be hovering around “You’ve gotta be kidding!”
Excellent tutorial and workmanship JP. As many body work experts will say, surface preparation and removing all the rust are key to a long lasting repair. I used to use those ‘plastic’ pads, but I found they struggled to remove rust in pitted metal. As bits would break off if you applied too much elbow grease. I tend to use coarse wire brush discs, and very coarse wet and dry sandpaper discs. Combined with rust removal gel. I’ve found if you don’t get rid of all rust, the damage will reappear in about two years.
Rust is a severe problem in much of Canada as well, but mainstream ‘collision’ centres typically don’t do any rust repairs. They stick to the insurance work. Rather, it’s necessary to go to shops that specifically specialize in rust repair or restoration.
That was quite interesting, thanks, hopefully it is something I will never need to refer to. I recall watching Edd China paint on that magic rust elixir onto what must have been at least half of a 1960s Mini in order to firm up the rust enough to be able to weld, sand and make the car look good enough to sell again. You seem pretty good with a rattle can too, if that whole lawyer thing doesn’t work out you may have a second calling in the trainyards late at night…
While living in upstate NY, I would visit the carwash after each snow storm to wash off the salt, grime, and muck. The carwash featured underbody spray jets to dispense the salt. This strategy worked to a certain point, but after 8 years and 220K miles, it was time to let go of my Ford Escape when I retired and returned to the south. The tinworm was working its way around the wheel wells.
Surprisingly, a man bought it and took it to Mexico. With all the sun shine, I’m sure its still running!!
Well done, with an appropriate level of finish. Any better than that and you would have spent too much time on it.
Now you need to pull out the interior panels and hose the entire area down with Krown rust goo.
Yes, I know. Unfortunately I have been too busy to follow your advice because I have been fixing the rust that has formed after not following your advice.
Nice work! My lazy solution would probably be to just buy a black, brown, or maroon car so the rust wouldn’t be as visible.
Twenty years ago I tried something similar on a white early-80s Camry that had rust of similar severity from a parking lot bonk, and it bloomed back in fury the next year. What I did wrong I do not know.
If I lived in the Rust Belt I think I would seriously investigate a car ownership model I have refused to embrace otherwise: rolling from lease to lease on the best deal you can find on the cheapest econobox you can stand. And keep something you actually like to drive out of the weather for the salt months.
Metro Detroit uses rock salt on the roads, in prolific to excessive degrees. It is routine to see cars rusting at that same spot above the rear bumper. The only effective response is to put a car up in the winter and drive an expendable beater. I did the storage/beater thing with my 98 Civic. The result was the car was unbelievably clean when it was 15 years old, but, being a hatchback, stick, without a/c, I had a hard time selling it anyway, regardless of the lack of rust, so the entire strategy of paying for a second car, plus Michigan’s exorbitant insurance rates, had a sharply negative ROI.
I attempted rust repair on my 70 Cougar back when the earth was young. Tried an alleged rust removing product called “Naval Jelly”. I found “Naval Jelly” to be totally successful at removing money from my wallet for zero return.
Yes, Hondas are vastly more rust resistant than they used to be. A coworker had a 76 Accord that developed patches of bubbling paint 3-4″ across on the top of both front fenders, by 1980. It might have been the massive amounts Honda paid in class action suits about their car’s eagerness to rust that persuaded them to improve their materials and designs.
The first work I ever did on a car was helping my dad bodge our ’81 Renault 5. It was white, and previously belonged to my grandmother who scraped all four corners on her wrought iron gates.
The dealer’s repair turned out to be temporary, so we wirebrushed and sanded until we were left with four good sized holes and my dad filled it with plastic filler. He didn’t bother to smooth it off much, and then made a futile attempt to sand it the next day. Other surface rust spots were treated with Comma Stop-Rust, which dried brown. It was driven like that for a while, then when a friend said it resembled an Ayrshire cow, we sprayed it white, with no primer, virtually no prep and no masks, in the garage. I was about 7 years old. That car was sold at at 7 years old, 36k, for £350.
Dad isn’t a DIY guy. In hindsight I’m amazed he attempted it.
Your dad sounds like my Uncle Bob. He did some rust repair on the lower front fenders of his 65 Pontiac Catalina in the early 70s. His method was to pour some touch-up paint into the Bondo he mixed up, then spread it into the holes as smoothly as he could. For a quick and dirty way to fill rust holes I have seen a lot worse.
I have an 09 Crown Victoria that needs some “touching up” in spots while about a quarter of the roof needs more serious attention. This has helped to give me the encouragement I need to tackle the repairs.
Coincidentally, my car is white.
I have owned 4 Honda products and only 1 of them developed rust spots where the rear bumper attaches to the body. That was the 92 Integra that I bought when it was about 10 years old.
Another coincidence? One of the new to me cars that I am considering is a white Fit. Though in my case a low mileage 2016 EX with CVT. If it were not for that CVT I would have made the decision to buy it weeks ago.
JP, you’ve evidently got a great deal more endurance than I do for drawn-out, multi-step tasks; I struggle with low sticktoitivity. Imperfect though it be, that’s quite a good result you got, I think. I doubt I’d be able to muster the patience to achieve similar results (and my Honda’s silver; metallic paint adds a great deal of difficulty to patch-matching).
I can contribute a little on the rust-abatement products. OxiSolve does not convert rust or steel into zinc oxide; that’s not chemically possible. What it does is dissolve rust and leave a rust-retardant, paint-compatible zinc phosphate coating on the remaining metal. And yes, it does weaken with age; shelf life is not infinite.
Rust Reformer, on the other hand, converts iron oxide into iron tannate, which is much more stable (and is paintable).
Products you might try in future: Evapo-Rust (fast) or molasses (slower, but yes really).
Thanks for the chemistry lesson, something I know virtually nothing about. And for the suggestions.
I don’t think Eastwood sells Oxy Solv any more, or they have changed the name. I was afraid that years (decades, even) of quietly sitting in its gallon plastic jug might be too much for it. It was not working nearly as well as I had remembered. It was really good stuff in the early 90s. But then so was I. 😁
I feel for you on your Honda’s silver. They have a lovely pearlescent yellow. Unfortunately after a minor driveway accident dented the tailgate of Number One Daughter’s mint-condition ’05 Jazz, the insurance company totalled it. The body shop said they’d have to paint the whole car up to the windshield(!) to get an acceptable blending in of the pearl colour. Unfortunately in signing the paper for the repair shop to quote, she signed away rights to get her car back. I smelt a scam; we changed all our family’s policies to another company.
So what did Number One Daughter replace it with. Another Jazz, the next generation. Colour? Pearl yellow, natch.
I will be interested to hear how she likes the new one compared to the 05. In my experience this Gen1 version (the GD) tends to make people love it. I have not decided if the newer ones have that same quality.
Posts like this remind me that I made the right decision in moving from the rust belt to the desert 🙂
JPC, any advice on how to prevent this rust from occurring on my girlfriend’s 2012 Honda Fit? The car has about 30,000 miles and is, thus far, rust free. But, we live in Houghton, Michigan, which must be one of the most heavily salted areas of the country.
If your bumper cover attaches to the wheel opening with a screw like this I would suggest removing the screw, pulling the bumper cover back and seeing if you are getting any mud accumulation around that nylon nut. A good cleaning there (and maybe a little wax on the metal) should help. If corrosion has started, you will be in luck as none of the process outlined above will be visible.
Thank you for the interesting tutorial. I prevented rust from forming on my 2003 Accord Ex sedan by regularly washing this area – first by wiping out the inside of the wheel well lip with soapy water, and then rinsing it thoroughly.
Interestingly, just this week I saw a previous-generation Toyota Avalon with rust forming on this exact spot.
You have inspired me.
Here in Brisbane, Australia cars hardly rust. My 2003 Honda Jazz (Fit) in the same color certainly hasn’t. It is in perfect condition except for some stone chips in the plastic sections and the black plastic is showing through just like you say.
I’m off to buy a rattle can.
My partner Matt has a 2011 Fit bought just over 2 yrs ago. It is still rust-free. He has one of those electronic rust guards which I’m not really convinced work, but hey his car has no rust, so I guess! I bought my 2007 Focus wagon 3 yrs ago and it was rust-free then, and still is. I have it sprayed with Rust Check every year. We live in southeastern Ontario where the road salt is pretty bad.
The repairs you did look ok, I’ll bet it’s much harder to repair a white car than a darker one.
Driver’s side always rusts much worse than passenger side.
Salt is spread down the center line. That’s what does it.
A great tutorial that I hope I never have to use. Despite your claim of being impatient, you are far more patient than I could be for such a repair.
That said, I did have to perform some rust repair on the drivers floorboard of my ’87 Dodge pickup. It involved pop-riveting sheetmetal to the good parts of the floor and caulking around it. For beauty I covered it up with a floor mat.
I was able to maximize patience by working on stretches that were about 30 minutes to an hour at a time. That interval usually got me to either a good stopping place or a mandatory break for something to dry. The other thing was that this car sat in a garage whenever it was not being worked on. The Miata was my daily driver for the 2-3 weeks that this project took. Rain and too-cold temps probably doubled the amount of time from start to finish.
A little bog and paint can hide a multitude of sins, getting paint match right can be a nightmare though white was easiest untill so many different shades appeared on the market oh for the days when black sills and GT esque panels were in vogue, I had some paint matched by formula to touch up my classic by the same supplier from when I first painted it and no it doesnt match.
My ’98 Odyssey and ’99 CR-V had rust on both sides in exactly the same places. Most old Hondas I see in the Toronto area look the same. I don’t see more recent ones doing the same so perhaps Honda actually learned from this. Mazdas on the otherhand…
Nice write-up JPC. For many years driving older cars I became quite familiar with repairs such as these. As much as I have been lamenting as of late about the GM B-bodies, I don’t miss their lack of rust resistance compared to modern cars. Our old white ’99 Civic was just developing the same rust spots when I sold it in 2011, even with Krown rust proofing. That said, our winters are longer and more harsh than yours.
One thing I’d suggest to you for future repairs is to get your paint from a body shop supply store. There they can mix up your paint in single stage and put it in a spray can. The quality of paint is much better than the off the shelf Duplicolor stuff and it’s not much more money. Plus you won’t have to try and blend clear with your single stage. I don’t have to do these spot repairs anymore but I do a lot of painting of parts for my project vehicles. I found over the years I generally get better results if I spend a lot of time making sure the prep is perfect, then spray the coats of primer, let it flash and spray the coats of paint. Spraying, letting it dry and then sanding between coats is rather time consuming and often doesnt yield better results.
Back in the 80s there was a local body shop supply company that would mix me a small (pint?) can of paint, sell me a can of reducer and a small reusable sprayer that consisted of a replaceable aerosol sprayer with a small glass bottle that screwed onto the bottom. I had to mix my paint and reducer/thinner but could then spray it. Last time I was there they told me that they no longer sold any of those products to retail, only to shops. I might look into something like that again if I plan to do more of this.
That is different that what I was talking about, and I am not sure if anyone does that anymore. All of our local shops will mix the paint and put it into the same standard spray aerosol can your Duplicolor comes in (although, typically larger than Duplicolor). There are no reducers or anything else required. It’s ready to shoot.
FWIW, all our body supply shops will sell everything to the public. I have bought epoxy primers, single stage and two stage paints and the required reducers or catalysts. They can mix by paint code or use the a scanner to get a near exact match due to oxidation. Of course to use this stuff you need the proper equipment and it is a lot more work.
You might try NAPAs for this, I know that the one that my Brother was the manager of had the system to mix paint and put it in the aerosol can. The paints carried NAPA/Martin Senour branding on the package. Yes most of the business was wholesale but the certainly would sell it retail whether the straight stuff or canned to spec. My Brother got the job there because he was a painter that worked at the kind of shops that had their own mixing systems, so he had experience.
I got a panel shop to mix paint for my EH Holden colour was Mitta green discontinued Xmas 63, they found the original mix code though it took an hour or so from memory it cost $90 for four litres acryllic laquer, the top was Fowlers Ivory common to all two tones of that era
Before shot, a tree fell on it a one previous owner car when I got it.
Cannot stop thinking why you hold on so long for, if you do not mind me saying, just another boring modern car. And then to put so much effort in it for a small rust spot.
Of course the rust must be stopped but I would not have spend the time and effort to a bland car. Don’t you guys like cars? If so why then own this little Honda? And for so long?
Please do not be offended, that is not the purpose. I genuinely cannot understand why car-people own nondescript cars. And even work on them!
Three months ago I have rust-treated the sills of my 14 year old (modern to me) Jaguar X-type estate. But even on this pretty rare car (I have never seen another example here in the Netherlands), I found it hard to justify the work to myself. I would much rather spend my time and efforts on one of my classics.
I guess the short answer is that I like it. And it is paid for. It does everything I need it to do. And I have a Miata in the garage. I did the serial car-trading thing for quite awhile, but when you like something there is no reason to get rid of it. I get to indulge my secret car-whims right here.
Let me try to explain, as the founder of this site. Curbside Classic is primarily a car-spotting and automotive history site, and not a site about owning vintage/classic cars. That’s a very big difference. My interest in cars has always been primarily about the industry and history. I have never owned a “classic” car; my 1966 Ford pickup is strictly a work truck. I don’t attend classic car events/shows, with some exceptions. I don’t belong to any car clubs, etc..
I have always had an affection for older things that were still being used, and that includes many other things in addition to cars. I fix up vintage houses, for instance. And I’ve always been interested in all forms of transportation.
CC reflects these interests, and has apparently attracted like-minded others. Since CC welcomes contributors, our range of coverage has expanded, including write-ups of reader’s cars, among others.
But we are decidedly different than so many other car/classic car enthusiast sites. Although some of our contributors own “classic cars”, many of us, probably the majority of us, don’t. But that doesn’t diminish our interest in older cars and automotive history.
If anything, I think it enhances our abilities in automotive history, as we spend more time reading and thinking about that subject than obsessing on and restoring our classic cars. I would pit our better automotive history articles here against any other site, magazine or books. We have covered esoteric subjects I’ve never seen covered elsewhere. We are enthusiasts of automotive history, not classic car owners.
You’re certainly welcome here, but please don’t judge us on the cars we drive; judge us on the quality of our written work here.
And as a matter of record, I too keep my cars a long time; 15 years, typically. I get my automotive kicks in different ways than you, apparently.
Thanks Paul & JPC for the replies. Please note, as I said, that I did not want to offend anyone. Of course anyone is entitled to own / do whatever they like. In fact, the variety of cars / options is what brought me to this site. The whole American/Canadian view about cars and transport is interesting to me, as I have always only had the European viewpoint so it is refreshing to learn from the other side.
But my question was genuine! In my 20s I had friends which were into cars, thirty years later most of them have lost the interest and all have boring cars. That I find intriguing – because that did not happen to me and some other friends. Our interests have not changed that much over the years. How come their interests have been changed?
It is not a money thing. Modern cars are more expensive over the years to run/keep/maintain/repair/insure compared to older cars.
Maybe this is a discussion that I should not have brought up here. If you feel like that, I apologize.
Although I have some “classics” (most of which were bought very cheap) my family also own some moderns. But there again, if I can have it my way, it will always be a bit special.
Keep up the good work / articles, I will shut up now here …… maybe contribute with some articles if that is allowed.
Yes, we always welcome contributions.
And although it is certainly possible to perhaps drive cheaper with an older car, I have found that the convenience of a repair-free newer car that is also very cheap to drive is a hard combination to beat. My ’05 Scion (Toyota) xB is almost 15 years old and has not had one repair, just a few maintenance replacements (battery, oil, filters, brake pads, wiper blades). And insurance is very cheap too, for me anyway. I have a hard time imagining being able to drive cheaper and yet have no worries about something ever breaking. And it’s not boring; it’s actually a very sporty and fun car to drive on curvy back roads.
In my case, since I’m responsible for the repairs and maintenance of some 12 dwelling units that I own and rent out, I’ not interested in doing any more maintenance and repairs on cars than necessary. And I’m also not getting any younger. Maybe you’ll feel a bit different when you’re in your mid 60s?
I took no offense, Dion. One of the things I like here is that I get exposure to views and attitudes about cars and driving from many places around the world.
Your question has remained in my mind for the last couple of days: why do I keep this car? I have decided that I like it better than I like the newer ones. It has also proved to be one of the best cars I have ever owned from the perspective of reliability. Finally I don’t really know how to describe that intangible thing about how a car makes you feel when you drive it – let’s just say that more often than not I am happier after taking a drive in it, even after 12 years. Those cars don’t come along all that often.
Our beloved ’86 Honda Civic AWD wagon died a rusty death. At 150,000 + miles, we were told the rear end was ready to fall off (the axle, not the body).
My wife would drive one today if we could find another one.
Repair turned out well, I doubt very many people will notice the minor imperfections.
Being one of the more extreme cases of keeping a car going as long as reasonably possible, I am happy that I live in a no rust area. In 3 more years the ’86 Jetta will have been in my possession for 30 years. I don’t drive much these days, so maybe I’ll sell it in 2021 and just drive the ’04 Titan I bought new. It does have about 284k less miles than the VW has!