

’72-‘77 Nissan Laurel 2000SGX (Hasegawa) – excellent quality
Sometimes building a model can be more challenging than you expect. There’s always the skill needed to assemble the parts correctly; to paint things neatly and in the appropriate colours, to avoid getting glue smears on the finish – but sometimes the manufacturers make it a bit more difficult, with the issue of Quality.
As a car enthusiast, it’s interesting how some car manufacturers periodically rediscover quality, trumpet about how Quality is Job #1 or whatever this year’s slogan is, then progressively de-emphasise it and bean-count it away until their reputation suffers. Rinse and repeat. Other manufacturers never make a big song-and dance about it, but deliver it consistently. It’s an attitude thing; do they care about the customer’s experience or just want his or her money? It’s the same in scale.
Quality issues with models are usually down to features inherent in the manufacturing process, moulding defects, or packing defects. Some you can fix yourself; I’ll start with those. I haven’t taken photos of all of these; I’ll just describe them and show a model that was afflicted before I fixed it.

Auburn Speedster (Pyro) – From a fifties tool, fifties quality
It would be easy to pick on older-tool kits I’ve built, like the old Pyro Auburn Speedster as examples of poor quality – but that would be an unfair comparison. This was state of the art seventy years ago. Any field of human endeavour advances over seventy years. Or should.
Mould lines

AMT ’55 Chevy – An exposed mould line, from headlamp to fender bottom (both sides).
These aren’t exactly a fault. They’re pretty much inherent in the manufacturing process, but you have to deal with them. They’re often hard to see. Firstly, because they’re so fine (almost hair-thin), but also because manufacturers tend to hide them (which is good) on the edges of the body, fender tops, roof edges or in pre-existing body lines. I tried for a photo of these ’hidden’ ones, but they really don’t show up well. You might need a coat of primer on the body for them to be obvious. That’s when you need to rein in your enthusiasm to get on with it, and take a careful look instead.
Mould lines matter most on the body and, to a lesser degree, the interior. That’s what’s going to show when the model is built. Personally, I don’t bother about them on engine and chassis components unless they interfere with parts fitting together properly. It’s a matter of diminishing returns: ask yourself whether it is worth the effort of fixing them? If you were building for a judged competition, then fine, hunt down and destroy remove every single one. Judges look for flaws. They have to. General spectators won’t be looking as critically. And a visitor who sees a model in your house will probably be blown away that you built it, even with flaws.
Fixing is a matter of sanding, perhaps filing first if they’re bad. If you don’t, they can show through the paint, and you’ll end up wishing you’d spent a bit more time checking things over first. Been there, done that…..
Sink marks

Sink marks (filled) on an AMT ’69 Corvair; mounting tabs on the other side.
These are also inherent in the manufacturing. They are small depressions or dimples in the surface of a part. They occur when the plastic cools unevenly after being taken from the mould, and are most often found in thicker sections of parts, e.g. on the outside of the body where there is a rib on the inside.
These need filling with putty (modelling putty or car body goo), then fine sanding and priming. Comparatively easy to fix.
Mould mismatch
I couldn’t find an example to photograph – I’m glad. This one is a real curse. It could be avoided if the manufacturer cared.
I’m not sure how it is physically possible, but sometimes on an older kit you’ll find, say, a 1mm ‘step’ where two sides of the mould come together. 1mm isn’t much, you say? Just shy of 40 thou? Well, remember we’re talking about 1/25 scale. Would you accept something misaligned by an inch on a real car? That’s the scale of the problem here.
Once again, on engine and chassis components I’d let it go unless it compromises parts fit. Fixing a mismatch on a coil spring is no fun! But for the body – no way. One particular kit will always come to mind here, a Rolls-Royce Silver Cloud II, by Minicraft. They’re a small company that seems to specialise in re-running old tools; bringing old kits back from the dead, you might say. This has its problems, stemming from old worn-out moulds.

Rolls-Royce Silver Cloud II, after repairs.
This kit dates back to about 1960, which means the tooling is about 66 years old. I think it was originally a Hubley kit, and appeared in a Revell box for a while. Anyway, the one I built had a 3mm mould mismatch on one front fender, resulting in a 3mm ‘step’ on what should have been a smooth surface. The plastic Minicraft had used was so hard I had to resort to a wood rasp to knock it down to an approximate shape, then progressively file and finally sand until I had it the shape it was supposed to have been.
I have only once in sixty years found a mould mismatch as bad as that. Why didn’t I complain? Simple: I only paid $10.
Short Shots
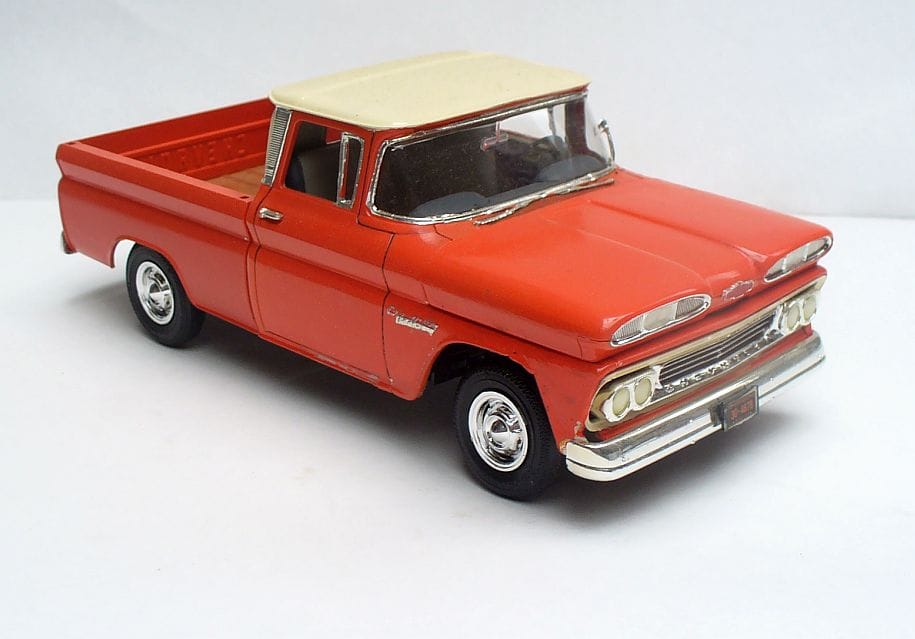
AMT ’60 Chevy pickup – area ahead of front wheel was AWOL.
These should never get out of the factory, but should be caught by QC, so you won’t often find one. In sixty years I’ve come across five. They occur when there is not enough styrene injected into the mould. Areas furthest from the injection point don’t receive any plastic, so that area of the part is missing when it’s pulled from the mould. I have found these down the bottom of fenders but they can occur on any group of parts. A small short shot on a body is obvious, and can be fixed by an experienced modeller, but it shouldn’t have to be. If a short shot occurs on a tree of small parts, some entire parts could be missing, and you probably won’t notice until you go looking for that part. It’s a hassle to have to contact the manufacturer for a replacement because of their lack of QC; even more so when they’re in another country.
Warpage

’76 Camaro –had to reshape the front fender with hot water.
Oh boy, this one’s common enough to be a pet hate. I’m told this is caused by taking the parts from the mould before they’re sufficiently cooled. Some larger parts, like car and truck chassis, seem especially prone to warpage, probably because of their shape more than their size.
Sometimes it’s spectacular, like on an AMT ’40 Willys I bought back in the seventies. The entire rear of the body, trunk and rear fenders looked as though the car had been hit in the rear. That was not the effect I was aiming for. They sent me a replacement body (slow boat from the USA), and I wound up fitting the old body to a junk chassis as a speedway car. (No picture, sorry.)

‘72 Ford pickup (Moebius) – chassis is just a bit warped.
Other times it’s not noticeable until you realise your car has a wheel in the air. By the time you’ve built up the chassis to that stage, it’s usually not feasible to disassemble it to straighten the chassis, (styrene glue is pretty much for keeps!) but careful use of a heat gun can soften the plastic enough to straighten it.
Accuracy

Honda N360 (Hasegawa) – The most accurate I’d built until then.
This can be very subjective; what bothers one person may pass totally unnoticed by another. But ask yourself whether the overall shape of the body looks like the real thing? Does it look slightly off somehow? Can you figure out where the problem lies? Is it something you can fix? Or will it do?
People here have often commented on my models that the ones of smaller cars somehow look more realistic than the larger ones. I don’t think it’s just that (most of) the Japanese manufacturers take more care. There’s more to it than that.

’72-’77 Nissan Skyline 2000GTX (Hasegawa) – The perfect kit?
I’m noticing more faults nowadays with more computerisation. The old way of photographing and measuring everything must have been an incredible amount of work, but could produce really excellent results. Admittedly there’s always a learning curve with new technology, but when the end result – the kit in the store – is visibly inferior to what that company made before, then it seems to me that that particular technology isn’t ready to be deployed just yet. Do a test shot and give it a serious eyeball check – does it look right? Is it off somewhere? In my case I’d ask myself ‘Is it as accurate as a Tamiya or Hasegawa kit?’ They can do it.

’70 Torino (Revell) – tool from 2000, no obvious faults.
For example, Revell seems to have a problem with window mouldings. Their ‘76 Gran Torino, out of the box, sports a side window moulding that would be a scale two-inch high strip of chrome. Now I’m not familiar with these Torinos, but that can’t be right. A look at photos on the net confirms Revell got it wrong. It throws off the look of the entire roof, and makes it seem too low. I’ve seen this on some other kits of theirs too. They never used to have this problem, as a look at their ’70 Torino proves.

’76 Gran Torino (Revell) – tool from 2017, side window fault (fixed here)
I sliced the moulding off mine, and replaced it with a strip of chrome foil. That’s maybe going too far. The alternative would be to use a strip of styrene (available from your hobby shop) to replicate a moulding of a more correct thickness; perhaps Evergreen #102, that’s 10 thou x 40 for a quarter-inch high by an inch wide. Want to replicate a wider moulding, say a quarter inch by an inch and a half? That’ll be 0.010 x 0.060. Look for #103. Their catalog is online.
There is an amazing range of shapes and sizes of styrene available – strips, sheets, patterned sheets, rods, tubes, channels, I-beams and more. Much of which I could never imagine using for anything, but it’s available.
Is Everything in the Box?

Lamborghini Miura – no longer a three-wheeler
Surprisingly (or not) sometimes parts can be missing. There’ll be a contact number, address, or email to get in touch with the manufacturer to report things like this. Okay, it’s their bad, but be polite. I’ve only once had to contact a Japanese manufacturer about a missing part (about fifty years ago), I think it was Nitto. This Miura was missing a wheel. It’s very distinctive; I had nothing like it. I began by apologising for not being able to write to them in their language, and I still remember how incredibly polite and self-effacing they were about it. I got my part all right – airmail.

’49 Ford coupe, with the right parts.
The funniest ‘missing parts’ story I have occurred in the 1970s. It was the time I bought an AMT 1949 Ford coupe kit, and found the chrome parts tree was for their 1949 Mercury kit! As you can imagine, there was no way most of the Merc chrome would fit the Ford; the bodies were entirely different back then. I wrote to AMT, admitting that while I could maybe build a one-of-a-kind custom, that wasn’t what I had in mind. Rather than the correct parts tree, they sent me a whole replacement kit.

Uninspiring box art, but the contents were welcome.
Sometimes you win!






I love how you get in the tangential aspects of model-making, though I’m no maker myself. I’ve been waiting and waiting for a 1960 Ford Country Sedan promo to appear for sale that isn’t warped. The distortion appears on most at the front, where body plastic meets the silvered grille, or is supposed to at least. IIRC it’s Hubley, and they could be bought as finished promo (is this what some call screw-bottom?) and make-it-yourself. I’m too scared to buy one because I’m pretty sure there’s no remedy for the distortion.
That’s a nice clean kenmeri btw.
Long answer, sorry! Don, that distortion is a function of the type of plastic used back in the fifties and early sixties for promos. IIRC it’s an acetate, not a styrene. Not as stable over time.
I have a friend in the US who used to have a side job in restoring warped promos for a dealer to resell as repaired. Sometimes he would sadly tell me of one that was past saving, but maybe 80-90% of them he was able to straighten. I can ask Gunther about the Hubley ’60 Ford, whether there’s any particular trick to working with them and straightening them. Conversely, I’ve seen a photo of a ’60 Ford that was so warped someone made a cartoon-style drag car out of it!
Screw-bottom refers to any older kit with a screw-on flattish plate-type chassis, as opposed to a properly-contoured chassis and floorpan to which individual details are added. Sometimes you would get plastic pins to press in instead of screws to join body to chassis, notably from Johan. It made for a positive location of the chassis rather than just relying on glue but compromised detail, with big cylindrical screw posts under the hood. Generally speaking, screw-bottoms went away in the mid-late sixties, as modellers sought more detail.
My Kenmeri thanks you. That one was a real labour of love.
Thanks heaps Peter. Reminds me of a styrene 45 I bought online. They were used as an alternative to vinyl and IIRC in jukeboxes when CDs started taking over. It snapped in transit because it wasn’t flexible enough. Aaaaaargh
Oh no! I’d never heard of styrene 45s, but I’m not surprised it snapped if it wasn’t packed really carefully.
I’ll get onto Gunther about that ’60 shortly.
I remember that the worst quality kit I ever got was a postwar Lincoln Continental made by Pyro in the early 70’s. It was just awful for bad fit, lousy casting quality and sub-par proportions. I never bought another Pyro kit. Back in that time the AMTs and MPCs were the best, with Revell being down a notch, but still a world better than Pyro.
I took a deep breath when I read that, JPC. Pyro kits – your Lincoln, my Auburn, and a host of others – were holdovers from the fifties and really behind the times by the sixties, let alone the seventies. Would you believe they actually brought that Lincoln back about ten years ago – what were they thinking? Google’s AI says it’s highly sought after, which is a load of rubbish, an AI dream. In theory, if it was a good kit, it would be – but as you found, it’s not.
Palmer kits might have been worse.
I was wondering when Palmer would get a mention. It’s hard to believe model cars were once so popular that someone could make serious coin by putting out a tenth-rate product. I found Mercury Marauders in my bowl of Honey Combs that had better detailing.
Yep, they were bad. I built one, I think it was a ’70ish Chevy – for a friend, and was amazed at the off proportions, the crude chassis, the multi-piece body with prominent join lines, and all the cheesy custom bits that were about ten years behind the times. These days GM would sue if somebody put out a ‘Chevy’ like that!
One thing I’ve struggled with on newer Hasegawa kits is that if anything they’re *too* precise, with no tolerance put in for paint thickness. The rear side windows on their 4th gen Civic are a real problem if you follow instructions and tuck them in from outside, B pillar end first. Or would be a problem if they weren’t pop-outs on the real car, giving a ready fudge if you can’t get them all the way in without damaging your paint.
I know exactly what you mean. I haven’t built that particular one but I found a few areas on my little N360 where I had to enlarge mounting holes and apertures for parts to fit. Windows weren’t a problem on the Nissan hardtops, but holes for mirrors, handles and the like were. That’s why we’re told to test-fit without glue first.
On the other hand I love your idea of having the windows ajar – brilliant!
That was some good reading, the intricacies of mould making are both art and science. Around 1990 both my brother and I had part time jobs working in the facility that manufactured the FOX-40 whistle, it was super interesting to see how the moulds were designed and built, as well as the production process.
One night my brother was working alone on the night shift, bored at making a run of white whistles, he decided to make a few red ones so loaded some red pellets into the machine. After churning out a few red whistles he switched back to red and was horrified when they started coming out various shades of streaky pink. He hadn’t realized that the mould needed to be cleaned between colour changes, so all he could do was keep going as the whistles became progressively less pink. I think he came home with three garbage bags of pink whistles in the trunk of the car, but his mistake was not detected by the company owner.
Doug, what a story! I remember hearing of Jo-han kits coming in swirly colour effects when they changed from one colour plastic to another, though I’ve never come across one – so evidently they weren’t too particular about cleaning.
I am sure there is a lot to mould-making that I would never think of – I have no engineering background – which makes it all the more galling when I see obvious mistakes in the finished product.
The biggest issue I’ve encountered was an AMT ’58 Chevy that was missing its clear parts. I just plugged ahead without them (I was thirteen). Kits using metal axles sometimes had three, or one.
Warpage was nearly always present. There was usually one hovering wheel. And getting the body to mate with the chassis never allowed for the low-slung profile I craved.
AMT’s Ford Taurus SHO requires careful filing down of the interior tub to avoid the sort of “engine’s pulled out” high front stance that isn’t even possible for a front drive car on halfshafts. Annoying to early teen me, a routine fix after 35 years and many builds of that staple ’80s (almost) regular-car kit.
AMT went through a stage back then where many of their kits had that problem. I reckon they took their measurements with the car on a lift with the wheels drooping, and didn’t make allowances for suspension movement. Just my theory.
All too common once, Walter – unfortunately. I had those same experiences, though not missing windows.
Peter, I especially enjoyed this one because it combines two things I enjoy reading about here – scale models and the know how to restore or fix cars or trucks.
I liken many of the corrections and repairs to your models that you’ve cited to actual bodywork, but done in miniature scale. It’s a way to participate in doing work like that, but without the need for a big garage and an expensive set of tools.
It’s not quite the same thing as what you’ve described, but my bane had been taking the correct amount of time and care to trim the excess flashing off of parts after I had cut them from the plastic tree with an exacto knife. I havs sometimes had to do minor work on my metal diecast models that I’ve purchased secondhand.
Beautiful work and great assortment of models, as always.
Thanks Joseph. I like your analogy – I’ve just had my grandson (11) in here moving my cars and people around, pretending to fix them!
After I’d sent this in, I thought of several things I could have added, but it was already pretty long. Trimming off flash was one of them. For those who aren’t familiar with the term, think of a mould line on steroids. The opposite of a short shot, it’s excess plastic squeezed out of the mould and stuck to the finished product along the seams where the mouilds join. Jo-han kits seemed especially prone to this.
You have a fund of patience and tenacity that I can never match. Wish I could. My hat’s off.
And I LOVE that Skyline 2000GTX! Beautiful. Have a great weekend, sir.
Some days I do, F-85, and some days I don’t. With experience comes the judgment to get up from the bench, walk away, and go do something else if your patience is wearing thin.
That Skyline is way up there in the running for my best model of 2026, along with the Laurel. But what else will Hasegawa come out with this year? We shall see….. 🙂
Under the category of Accuracy, or lack there of, I would like to nominate Monogram’s original issue of the 1969 Charger. I can’t for the life of me figure how it got past QC and some many others with a roof line that looked like it had a cop top from the factory. I mean their 69 Coronet and 70 Superbird were both spot on. I guess nobody looked.
Oh definitely, David, that was a shocker. I never saw that body, only photos of it. I can only guess some ‘executive’ type saw how much they had invested already and said, “That’s it. That’ll do. Run it like that.” – regardless of the damage it did to the company’s reputation.
I had a 1965 Mercury Park Lane that just would not go together. Young kid me at the time did not have the patience to mess with it a great deal, so a temper tantrum or two later it was gone. Had it all painted and all, but the body would not go on to the chassis at all. It was like it was from a different car entirely.
That is so sad. I can just imagine your disappointment. I’ve no experience of the ‘65 Merc (though I’ve built a ‘64 and a ‘66). Neither of those had a problem like you experienced, so it’s possible the chassis may have been for something else.
Peter: The Skyline and the Torino are exquisite! Back in my model making years, I found that Jo-Han made the best kits, and their attention to detail was always good. Thanks for another great, very enjoyable introspective!
Thank you, Moparman. That Torino was my best build for that year. Love the shape, though after decades of seeing our similar Falcon hardtops, the Torino looks huge by comparison.
The Skyline is fresh off the bench two months ago. I’ve always liked that model of Skyline (C110 or Kenmeri), so had a special urge to do the best job I could of it.
I love how you translate the errors in the models, via the scale, to what these errors would be on actual vehicles.
The detail on that Nissan Skyline is amazing.
Thanks Jeff. It’s one thing to think “This doesn’t look right”, but quite another to do the math to work out how wrong it is! Quite an eye-opener when you do – but in all fairness, how easy would it be for the manufacturer to see that fault in pre-production and correct it?
The Skyline stunned me. Take the round plated C-pillar ornaments: they’re correctly moulded in depth with radial lines engraved. One has a decal for a badge at the centre, the other a decal for a keyhole. Yep, one’s the fuel filler – and they represented the difference! Then you add the fact that you get the choice of coloured decals or chromed badges for the various scripts – and the instruction sheet tells you what colour the various parts of the badges should be. Even with a 10/0 brush I couldn’t do some of that stuff! Talk about going the extra mile.
The only reason I’d put it ahead of the Laurel is that I’m not as familiar with the Laurel.
It surprised me to see the low opinion of Revell’s Tri-Fives; not that I thought they were any great shakes, but I cut my teeth on those. They were my first “vintage car” models. The inaccuracies and cut corners were simply the name of the game. I didn’t think I had a right to expect better. Imagine my surprise when I built my first Monogram kit, with parts molded in different colors and chrome that didn’t need to be painted on. I felt spoiled! And then I made my first Tamiya model, and life would never be the same again.
Walter, one of the first kits I bought was Revell’s ’57 Bel Air, after seeing one an older friend made. That would’ve been about 1970 or ’71. He didn’t paint his, I did.
I think the problem is that as the hobby advanced elsewhere, Revell kept reissuing these (and other) kits with the sloppy fit of the hinged panels, the front bumper that dragged on the ground if you used the lowering option, the sometimes-fiddly assembly, the hinges that sadly broke…. As you say, Monogram had various colours and precision fit; but some of their kits also had questionable proportions (’69 Camaro, ’53 Chevy, ’56 Chevy., 57 Nomad….).
Tamiya really set a new standard for what could be achieved in a scale model, in terms of accuracy, precision, fit, you name it. (And their paints and putties!) Now Hasegawa is right up there with them (no they don’t pay me!), Aoshima’s not far behind, while Fujimi is… maddeningly variable, still.
I used to do a lot of later ’60’s and early ’70’s muscle cars, mostly from AMT, with a couple of the 1/16 scale Funny Car and Top Fuel cars from Monogram? Or was it Revel? A LOT of the AMT kits had warpage issues and I used the hotish water method to save most of them. If they folded up or just looked “off” they became a wreck with the help of my sister’s hair dryer and the kiss of my Berzomatic propane torch.
AMT’s USS Enterprise and Klingon Battle Cruiser models were just awful. I built at least 4 Enterprise’s and all of them had serious warpage issues. The engine nacelles on all 4 were twisted enough that they had to be tweaked after you put the ship together, at least the bottom section, because you couldn’t guesstimate how much rotation the individual nacelles needed to line up. The main saucer top was always warped and I used “Crazy Glue” to put them together because the styrene glue took a ton of clamps and overnight to set up. The Klingon ship’s main hull were always warped and again, clamps were needed and a fair number of big rubber bands. The Enterprise had light leakage issues and I started painting the inside of the model with flat black paint, and no matter how I tried, filler had to be used to seal the light leaks up.
I was friends with a guy who used to enter and win model contests, his cars were amazing, especially the paint jobs he gave them. I had for many years a Chevelle SS 454 car in a really nice green metallic, and some sort of candy apple hot rod he made out of parts from different models. The Chevelle won 2nd place at a Detroit model show about 1972? Sadly, neither survived the move from Vegas to Toledo in ’82.
Unfortunately a common story, nrd515. Quality control was an issue the hobby press compained about in the seventies, the eighties, the nineties… I think the problem was that manufacturers (both scale and full-size) did not put themselves in the place of the buyer. They didn’t ask “How would I like it if I spent my hard-earned and found this?” . Doubtless management types can spin all kinds of justifications for poor QC, but there is no excuse. In a free market, the customer can always go somewhere else.
The level of the skill casually mentioned here leaves me speechless. (Many CCers may consider that a relief, although, I cannot help but opine that, personally, I would have written to Nitto in the language of High Dudgeon, letting them know that I did not wish to build Mr Bean’s Muira. But that is to digress, and speechify). This craftwork is at the level of art.
I wonder, do you use a magnifier of some description for all this intricate work, for the ease of your eyes? My eyes were excellent for such stuff when young: alas, no more, and I am now the middle-aged fool whose vanity forgets his glasses, and who wastes the time of others in peering in and out, uselessly, at menus and tickets and instructions before having to ask those others what is written.
Relatedly, I have wondered if the continual exposure to the vapours of glues and general exposure to evil old plastic chemicals ever concern you?
Thanks Justy. I’m extremely short-sighted, and have to wear glasses all day – no chance of forgetting them. If I have trouble focussing, I just take my glasses off and hold the part about six inches from my eyes. That said, I also have cataracts and will be needing surgery in the next year or so. The surgeon says he’ll slip in a lens to help me with close work since that’s what I mainly do.
Exposure to glues and vapours? Good point, which I haven’t really thought about. Things are a lot less toxic than they may have been once, and certainly a lot easier on the nose than fifty years ago, but you still see warning labels. When Tamiya acrylic paints first came out, they stank; I had to use the bottle paints outside. Nowadays they pass unnoticed. I’m not equating smell with danger level, but the continual product improvement I can notice, coupled with stringent warning label requirements (does everything in California cause cancer?) leads me to feel fairly safe. Damage (if any) may have been done decades ago.
I’m just as careful as I can be, now,
To be fair, modern kits are (or should be) free of these issues, but of course some ‘modern’ kits are re-issues under different brands, which may catch the newcomer out.
A couple that I recall were the AMT ’41 Plymouth that I bought from a model shop ‘back in the day’, which which had a huge sink crater in the roof (I returned it and swapped it for the ’49 Ford). Then a few years ago I bought the MPC snap-together ’49 Mercury police car from a vintage toy shop, still in the cellophane. when I opened it the glazing was missing. I built it as leadsled with a chopped roof and made my own glazing from clear sheet. Problem solved!
‘May’ catch the newcomer out? Matt, I can assure you it does, unfortunately.
I used to be in about 20 FB scale modelling groups (I got banned for life as they thought I was a bot!), and not a week would go by without someone in at least one group complaining that all brand X’s kits were rubbish – because they happened to buy the oldest reissue in the catalog. The solution is dead easy! Mark the reissues plainly. Print a disclaimer on the box saying this is an old kit, not up to current standards of fit and features. Aoshima does this. And sell it for a lower price than the good stuff.
Several of us were known to ‘stir the pot’ sometimes by building a kit from said unpopular manufacturer and posting it to that group just to show what their some of their oldies can be made to look like (with a lot of effort, sometimes).
Some familiar problems there, Peter, applicable to a lot of kits (and many to non-plastic kits too). One of the most annoying is where the mould halves are offset. Occasionally I’ve resorted to attempting to slice mouldings in half and glue them back together in register, though with a very low success rate. A better option is have a spare kit and slice and file half the offending piece off each, then glue. This applies most to round (or similar) section parts, of course.
In recent years laser-scanning of the real thing has come into vogue, but it’s by no means a universal panacea that guarantees a good result. The basic scan can look pretty ropy; somebody will still need to sit down and work it into something that looks complete. Of course, that then opens the possibility of misinterpretation.
Still, overcoming these adversities is part of the reward when kit building and you’ve proved time and again you’re quite a master at it.
Ah, just the man I was hoping to hear from! As I was writing this, several times I thought “This should be Bernard doing this”!
To be sure, a lot of these faults I mention could be issues with any injection-moulded product. I would opine that building a scale model is often an emotion-charged endeavour. We want to do our best to represent the subject and have our personal replica of it – and how disheartening it is when the manufacturer makes our job so much needlessly harder by such an elementary flub as poor QC.
I’m glad to hear you say that about laser-scanning. It’s not just me being fussy then! It goes to show how amazing our human bodies are, that our eyesight and judgement are still needed to take the raw data from the laser scan and manipulate and refine it into an accurate representation. I’ve no doubt it’s early days yet for the technology, and that situation will improve.
Thanks, Bernard.
The first model I attempted, as a 12-year-old, was a bright yellow Miura for a modelling elective at school. It came with all its wheels, and looked lovely – on the box anyway, as I quickly found I lacked the skill to achieve the paint finish I desired on the body, let alone on the trim. Being able to spray paint would have made all the difference, but that was too expensive in the mid 1980s. Still turned out quite reasonable for a kid’s first (and last) effort.
The Butaketsu Laurel is just gorgeous, and looks like some nice interior detailing too. Much nicer than the Konami brand diecast Butaketsu here on my desk, where the rear side window is quite the wrong shape. The Kenmeri is delicious too, and the same colour as the only one I’ve seen in the metal.
Another excellent post Peter, thank you!
Thanks Scott. You got to do model building as an elective at school – wow! Nothing like that here, sadly; at least, not in my time. I totally hear you about the cost of spray paints though; I couldn’t afford them until I started work, and some of my early spray efforts were rather crude.
I had a mate in Japan send me the Butaketsu pretty much as soon as the kit came out, traded it for a ’57 Chevy. Considering it’s on the same basic platform as the Skyline, it’s amazing how different the kits are. The interior’s very nicely moulded and engraved, with plenty to highlight on the dash and console. Unfortunately I didn’t stop to take any pics of the interior – you might be able to enlarge this crop enough to see…